Our customer/friend (custofriend?) Bob came up with a great way to display our handmade and hand painted Italian ceramic butterflies, and was thoughtful enough to share with us his detailed play-by-play; we think this is excellent information that others would certainly appreciate! Before we get too far along though, you won’t find the butterflies on our website – since they’re each individually hand painted, it gets a little complicated with listing them online, BUT we are happy to email photos and pricing if you are interested! Just email us at info@italianpottery.com and we’re happy to help!
Following are Bob’s photos and his explanation of each step.
Step 1: Bob removes the wires we had affixed for temporary hanging in our store.
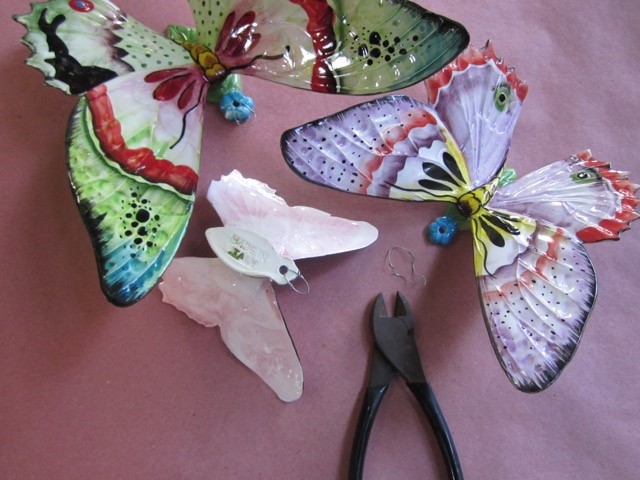
Step 1: Snip off the wires with parrot beak wire cutters.
“This photo shows 3 of the ceramic butterflies with 2 upright and one upside down. The metal hanging wires mounted on the head of the butterfly should be removed, the best way I have found to cut the wires is with ‘parrot beak’ wire cutters. Trying to unwind the wire invites snapping the head off, and the wire is too fine to really cut with a hacksaw or similar blade. ‘Nipping’ the wires in several places with the nose of the wire cutters is fast and does not endanger the brittle ceramic underneath.”
Step 2: Bob affixes silicone pads to the bottoms of the butterflies.
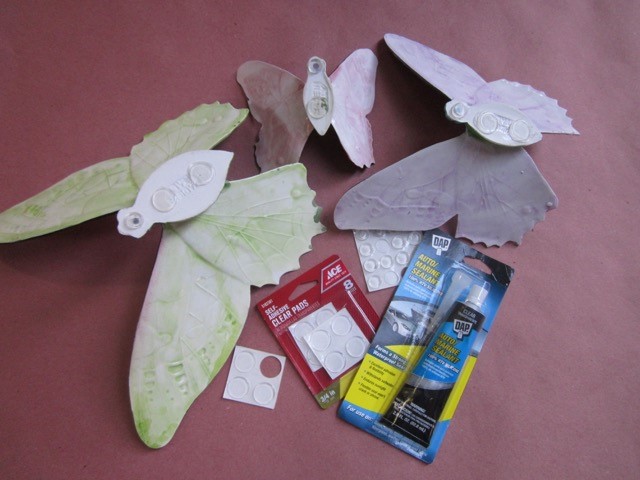
Step 2: Adhere silicone pads with a silicone-based glue.
“This photo shows 3 butterflies upside down. Also shown are ½ inch and 3/4 inch soft plastic pads that are normally used on the bottom of vases and such to protect the surface they are placed on, and a tube of marine grade silicone sealant & glue.
The pads are attached to the bottoms of the butterflies to space them out from the wall or tile surface they will be mounted on to provide drainage when it rains or they are hosed off when outside. And when installed inside, they provide a slightly flexible mounting that gives a bit when dusted. This flex will tend to prevent them from ‘popping’ off the surface when gentle dusting occurs. I have tried rigid epoxies and glues, and I have found the more flexible silicone to work best.
The plastic pad labeling states that they are ‘self-adhesive’, but they are not self-adhesive enough to hold the way we are mounting these pieces. Peel off a ½” pad and apply a dollop of the silicone glue to the sticky side of the pad. Then place it over the hole on the head of the butterfly as shown. Next take 1 or 2 – depending on the size of the piece – of the larger ¾” pads and also glue them to the body of the butterfly. Let dry overnight.”
Step 3: Bob expands the existing holes in a way that will hold screws securely.
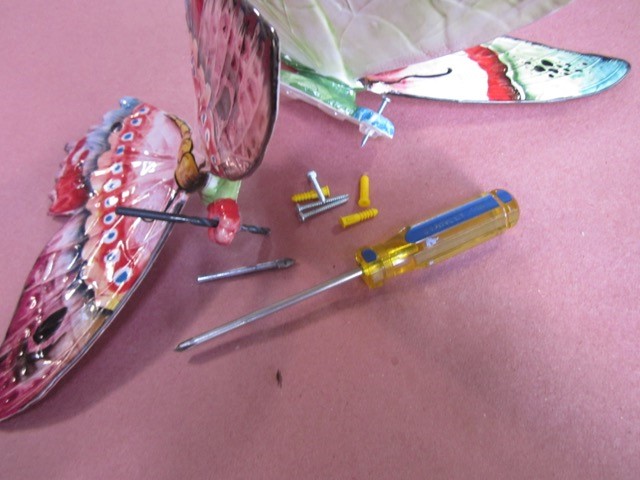
Step 3: Expand the existing holes and insert the screws.
“This photo shows 2 butterflies with holes drilled in their heads!
Place the butterfly on a scrap piece of wood and using a 3/16” regular drill bit, drill through the existing hole in the butterfly’s head and through the soft plastic pad. This will not cut a clean hole because the pad is too soft to drill properly, but that proves to be an advantage.
The yellow plastic anchors are labeled ‘4-6-8’ because that is the size screws that can be used with them. In this case, #6 screws 1” in length are used.
Also shown in this photo is a 3/16” inch spade drill bit for use on stucco walls &/or on ceramic tile. This will be used to drill the hole for the yellow plastic anchors to be placed in.
Note that the screw in the top butterfly has been screwed through so about ½” protrudes through the bottom. As stated above, soft plastic pads don’t permit a clean hole to be drilled, but the result is a rather ragged hole that actually holds the screw in place so it does not drop out. This is a great aid when it comes to actually mounting the butterfly to the wall.”
Step 4: Bob’s butterflies are airborne!
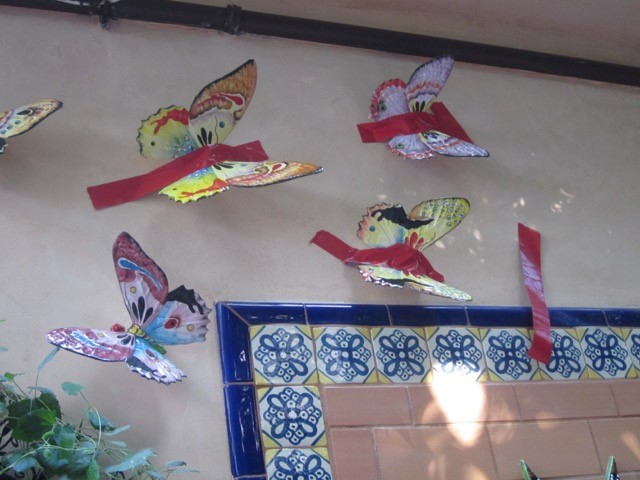
Step 4: Affixing the butterflies to the wall.
“Take the butterfly and play with it until you think it looks good and mark the spot with a pencil mark where the screw touches the wall. Using the spade stucco/tile bit, drill a hole and place the plastic anchor in it. If mounting several pieces, don’t worry about being too perfect with your placement as butterflies don’t fly in a regimented formation – they ‘flutter’ about in a rather random pattern, so it’s hard to mess up too much.
Note the length of red tape that has been pre-cut and lightly ticked by a corner to the wall. If you are mounting these alone &/or working from a ladder, you need to cut your tape and have it ready to grab prior to actually gluing & screwing the butterfly to the surface. (I have tried all sorts of tape – duct tape, blue tape, masking tape, etc. – and have found the red ‘stucco’ tape to work best for me.)
Apply a ‘dollop’ of the silicone glue to each of the plastic pads, including the one with the screw sticking out of it. Carefully line up the butterfly figure at the position you want, and holding it just off the surface without smearing the silicone glue on the surface yet, put the protruding tip of the screw in the anchor hole. Gently screw in the screw and push the silicone-covered pads against the surface and hold in place while you finish screwing the screw in.
WARNING! DO NOT tighten the screw all the way down and tight to the surface as you can snap the head off the poor little butterfly! GENTLY tighten the screw down so there is still a little flex when you rock the piece from side to side.
REPEAT: DO NOT tighten the screw all the way down, just tighten so it is ‘snug’.
Holding the butterfly in place with one hand, put down the screw driver and take the piece of pre-cut tape and tape the piece tightly to the wall without smearing the silicone glue all over the place. If you have a helper – great, but if you don’t, just push the tape around the butterfly and adjust it so the maximum surface contact is made between the pads and the surface. Rock back & forth lightly to evenly spread the silicone glue around.
Let it sit overnight or more depending on the weather and temperature.”
Step 5: Enjoy!
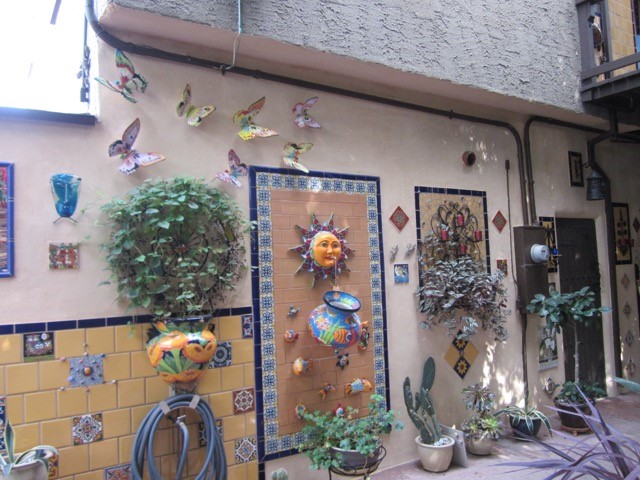
Step 5: Bob needs more butterflies! 🙂
“In this photo you can see that the tape has been gently removed and the butterflies are successfully mounted on the wall. Also note other fish figures around the fountain area. When I mount such figures on tile surfaces, I try to place the anchor holes in the grout lines so if they are moved it is easy to patch in the grout line and not leave a hole in the tile surface.
I then dab a bit of paint on the screw head with a disposable Q-tip. I use ‘Testors’ plastic model paint. I just use two colors, red & blue, as from a few feet away the colors blend in and the overall effect is excellent.
This photo also points out one glaring problem…the need for more butterflies! The project continues.
Good luck – Bob”
Bob also pointed out that during this butterfly extravaganza he learned that a group of butterflies is called a kaleidoscope – how appropriate!
Again, if you would like information on the butterflies pictured here, please call us toll free at 877-496-5599 or email us at info@italianpottery.com!







Leave A Comment
You must be logged in to post a comment.